Step 1 - Choose Size and Quantity
Choose Options
Choose the options you want for your product
Step 3 - Choose Design Method
Login Required
Resellers Only - In order to proceed you must log in to your reseller account
Login | Register
Unit Price:
Please Login
Unit Price:
Please Login
Unit Price:
Please Login
Material
- 4 mil clear vinyl material or 4 mil white vinyl material
- Printed up to H 52” x W 120”
- 3+ year lifespan with proper placement and care
- Low-tac adhesive that is repositionable
- UV, scratch, and moister-resistant lamination (lamination included in price)
Finishing Options
Window Clings can be square-cut or contour/die-cut into custom-shaped decals. These are great for vehicle decals, window signage and more!
Create Your Product
Window Cling Cut Options
Die-Cut
Die-cut means that we are cutting through both the vinyl decal material and the paper backing. This cut type doesn't leave any material around the decal. Another way to look at it is to think of it like a "cookie cutter." Your decals are all individually cut out to the contour of your design, so you have individually cut decals with no paper material around the design.
Kiss-Cut
Kiss-cut means we are only cutting through the vinyl layer ("decal material") and not cutting through the paper backing, leaving a paper material border around your decal. When you choose a kiss-cut decal, you will have extra material around your decal for easy peeling.
Create Your Product
Payment
All window clings must be paid for prior to being put into production.
Credit Cards
We accept Visa, MasterCard, American Express and Discover cards. Your order will not be put into production until your credit card is approved.
Checks
We also accept checks. We must receive your check before your order will be put into production. Please contact a customer service representative for more information about check payments.
Create Your Product
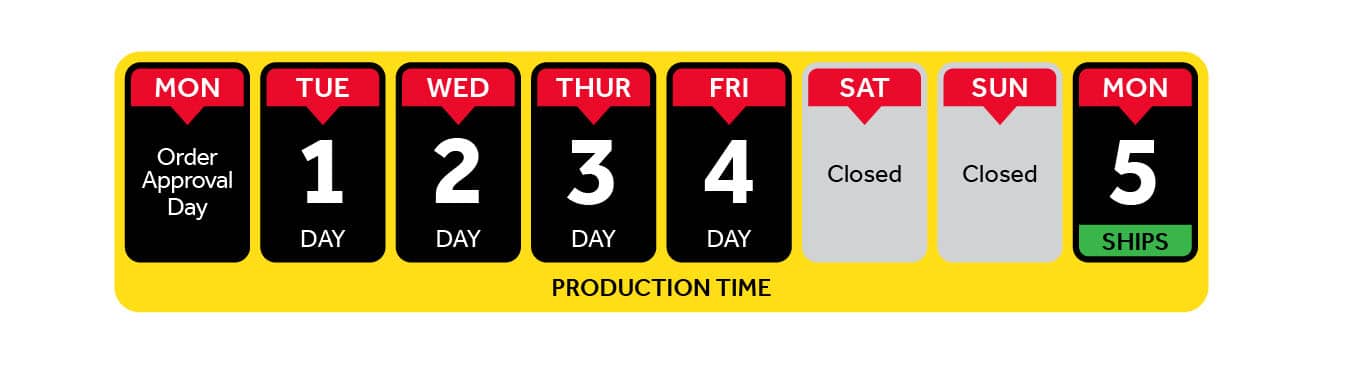
Window Clings Production Time Tables
We provide flexible production time ranges for you to choose from. Because it's important for you to have ultimate control over your order, our production times range from one to five business days. This allows you to make the final decision on when you need your order.
1 Business Day Priority:
Timelines can be tight. That's why we offer this zippy one day turnaround option.
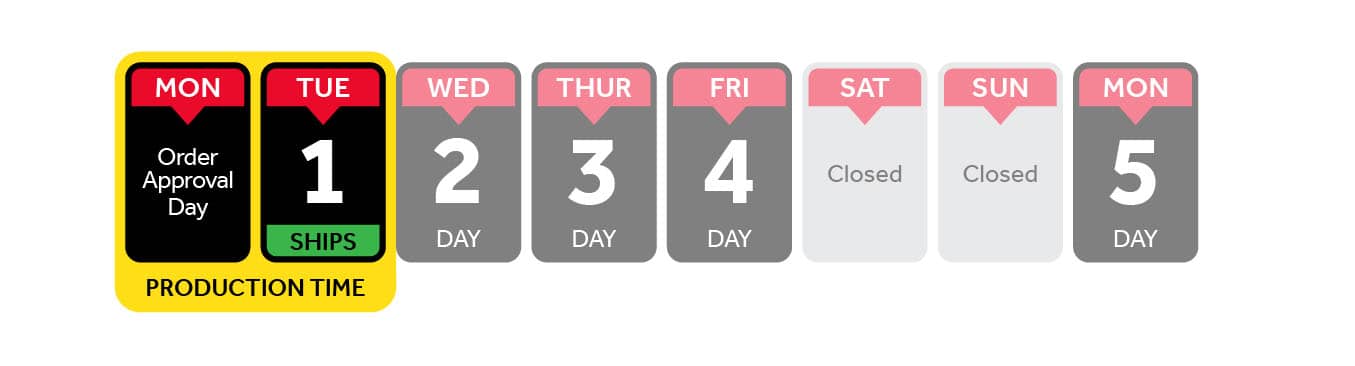
- Orders approved after 5:00 PM CST will be processed the following business day,
- Emergency/same day rushes are available in some cases, Please speak with a customer service representative today for more information,
- Note: The time it will take to receive your product includes the production time as well as the shipping time.
- Turnaround starts from the time the file upload is complete. If an order is flagged in our prepress department or a proof is requested awaiting approval, turnaround starts from the time the approval is given.
2 Business Days Express:
Have an extra day, but still need your products quickly? The express option is ideal for you!
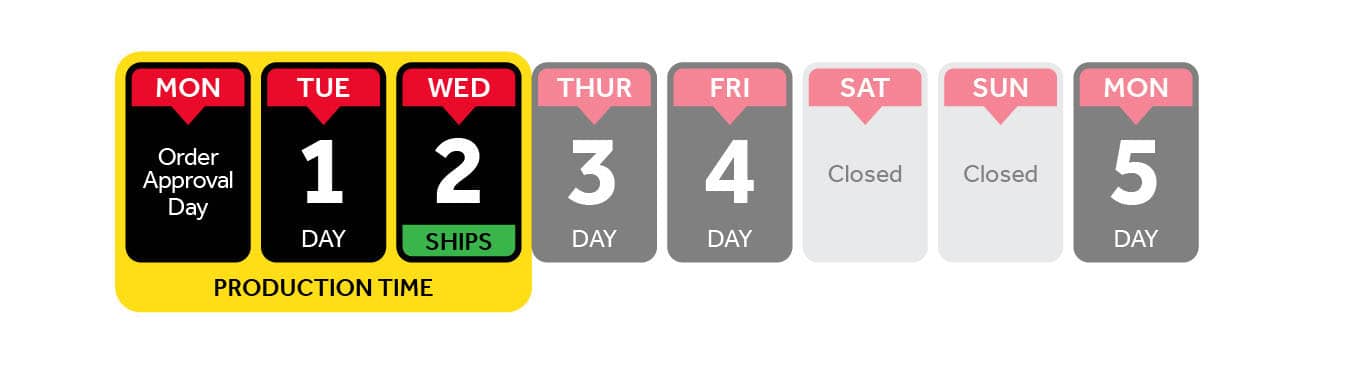
- Orders approved after 5:00 PM CST will be processed the following business day,
- Emergency/same day rushes are available in some cases, Please speak with a customer service representative today for more information,
- Note: The time it will take to receive your product includes the production time as well as the shipping time.
- Turnaround starts from the time the file upload is complete. If an order is flagged in our prepress department or a proof is requested awaiting approval, turnaround starts from the time the approval is given.
3 Business Days Standard:
This is our most popular fast turnaround option. Free and speedy enough for almost any custom order.
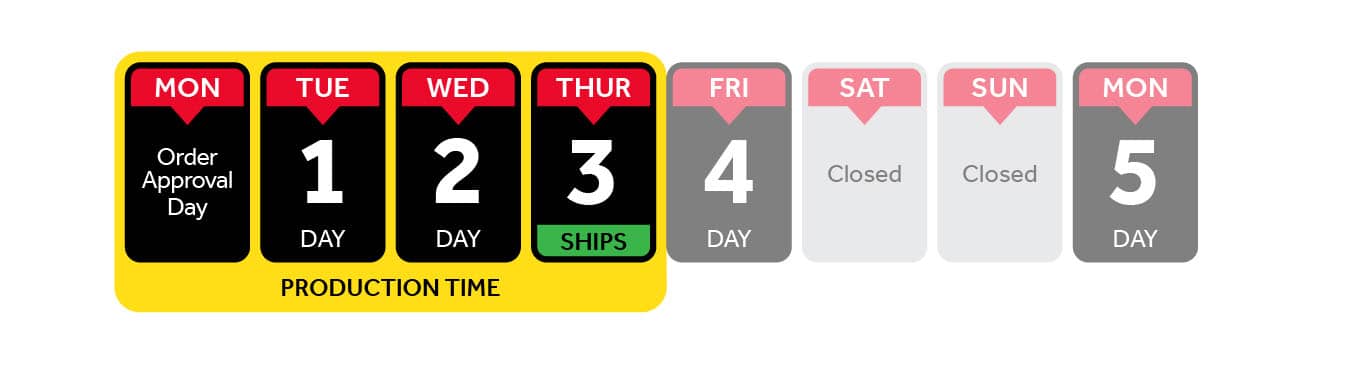
- Orders approved after 5:00 PM CST will be processed the following business day,
- Emergency/same day rushes are available in some cases, Please speak with a customer service representative today for more information,
- Note: The time it will take to receive your product includes the production time as well as the shipping time.
- Turnaround starts from the time the file upload is complete. If an order is flagged in our prepress department or a proof is requested awaiting approval, turnaround starts from the time the approval is given.
5 Business Days Saver:
If you’re not in a rush, then you can save some money by choosing our 5 Day Saver option.
- Orders received after 5:00 PM CST will be processed the following business day,
- Emergency/same day rushes are available in some cases, Please speak with a customer service representative today for more information,
- Note: The time it will take to receive your product includes the production time as well as the shipping time.
- Turnaround starts from the time the file upload is complete. If an order is flagged in our prepress department or a proof is requested awaiting approval, turnaround starts from the time the approval is given.
Create Your Product
Clear Decal Artwork Requirements
Files that print best are:
- .eps
- .pdf
- For White Vinyl Window Clings: Artwork within the file can be flattened/rasterized, but a vector file is required to have the cut path indicated by a vector stroke line.
- For Clear Vinyl Window Clings: Vector artwork is required.
File requirements
We print in four color CMYK or six color CMYKLcLm. Please keep this in mind when submitting files for printing as color tone shifting may happen if file is submitted in RGB format. If there is a specific PMS color you need, please specify that to us when submitting your order so we can help you verify that the proper color mix is used (vector artwork only).
Customer supplied files are printed as they are received so we cannot guarantee color, clarity or final output as we are just printing the supplied files and have not set them up for printing.
If you are concerned about the file output we will be happy to do a test print for a nominal fee prior to final order if requested.
All of our printers are calibrated daily to International Color Consortium (ICC) coloring profile standards to ensure accurate color production.
Create Your Product